¶ Differential Expression Workflow: RNA-seq analysis
¶ Author
Thomas Vannier (@metavannier), https://centuri-livingsystems.org/t-vannier/
Audrey Comte (@AudreyComte), https://centuri-livingsystems.org/a-comte/
¶ About
This workflow performs RNA-seq analysis on Galaxy from sequencing output data to differential expression analyses.
In this way you can easily change/add tools for each step if necessary.
4 steps for the analysis:
- clean: The quality of the raw reads are assessed using FastQC v0.12.1 toolkit. Adapters and low quality reads are trimmed using Trimmomatic v0.39.
- count: HiSat2 v2.2.1 is used for mapping the raw reads to the reference genome. The expression for each gene is evaluated using featureCounts from the Subread v2.0.1 package.
- differential_exp: The low expressed genes are removed from further analysis. The raw counts are normalized and used for differential expression testing using DESeq2 v1.28.0.
- intersection : You can compare 2 output files and see the common genes in the 2 files.
¶ Usage
¶ Step 1: Launch Galaxy
You can launch Galaxy by clicking on the Galaxy web page.
¶ Step 2: Create an account on Galaxy (if you are connecting for the first time) / or log in to your Galaxy account
To log in to your user account, enter your email address and password.
If this is your first connection to Galaxy, you will need to create a user account. To do this, click on “Register here”.
Then enter your email address, password and username. Then click on “Create”.
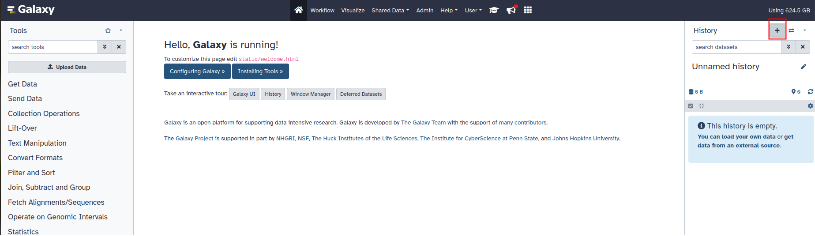
¶ Step 3: Create a new history
A history is a kind of dashboard in Galaxy. This is where the workflow input files and output files are stored. It is recommended to create a new history for each run.
To create a new history, click on the "+" symbol located next to "History" at the top right of the page.
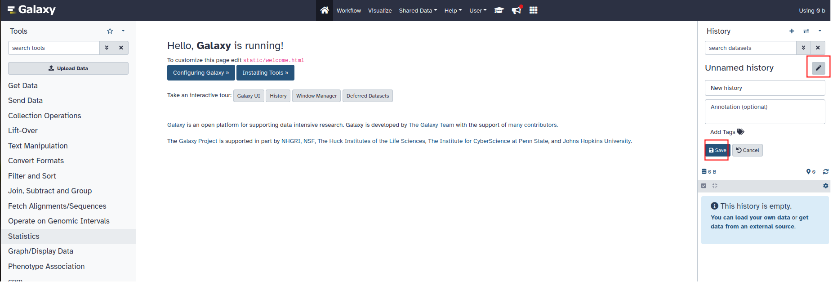
To modify the name of the new history created, click on the pencil. You can also add a description then click "Save".
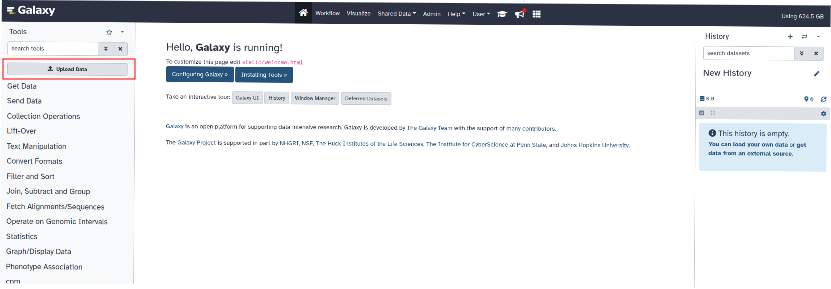
¶ Step 4: Add files to history
To add files to the history, click on "Upload Data" at the top left of the page.
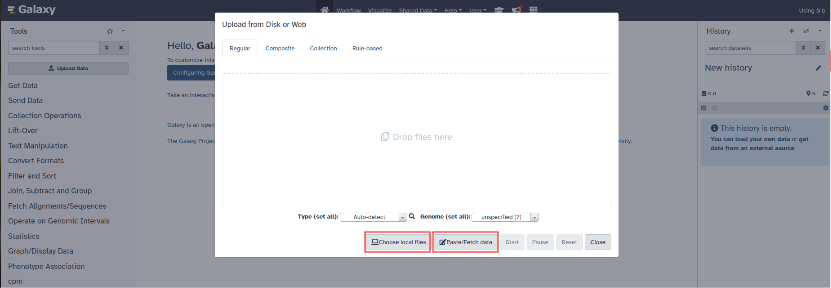
You can upload the files from your computer by clicking on "Choose local files" or paste your files directly by clicking "Paste/Fetch data".
Add the following files to the history:
-
fastq files in .fastq format
-
the reference genome in .fna format (https://www.ncbi.nlm.nih.gov/)
-
the genome annonation file in .gtf format (https://www.ncbi.nlm.nih.gov/)
-
the metadata file in .tsv format. The metadata file contains information concerning the conditions of the different samples in table form.
Here is an example table for the metadata file :
| project | condition | type |
|---|---|---|
| DKVD1 | Dorsalized | paired |
| DKVD2 | Dorsalized | paired |
| DKVD3 | Dorsalized | paired |
| DKVD4 | Dorsalized_torso | paired |
| DKVD5 | Dorsalized_torso | paired |
| DKVD6 | Dorsalized_torso | paired |
| DKVD7 | Ventralized | paired |
| DKVD8 | Ventralized | paired |
| DKVD9 | Ventralized | paired |
Project: sample names
Condition: names of the different conditions corresponding to the samples
Type: sequencing method: paired or single
PLEASE NOTE, the separators must be tabs and the file must be saved in .tsv format.
When you have added all these files click on start to start downloading into the history.
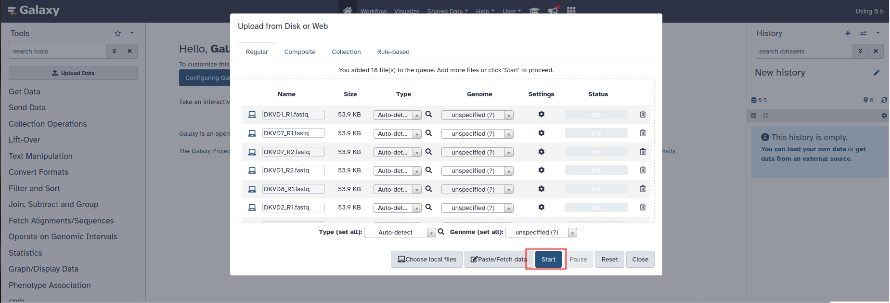
Once the files have finished downloading, the files appear green in the history.
You need to build a dataset list: in the History panel, select your FASTQ files using 'Operations on multiple datasets', then click on 'Build Dataset List' or "Build List of Dataset Pairs" if your data are paired end.
¶ Step 5: Install the Bulk RNA-seq workflow on Galaxy
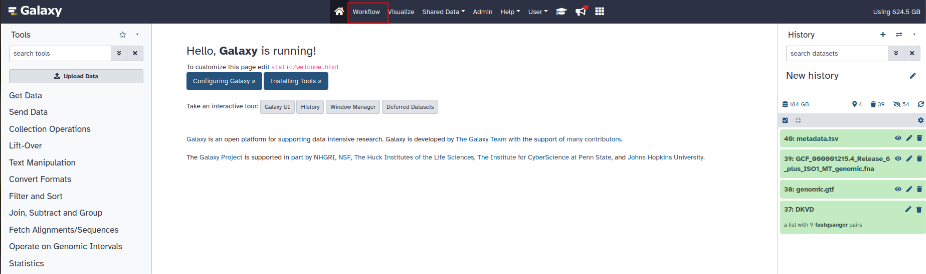
To import the workflow into Galaxy, click on the “Workflow” tab at the top in the middle of the page (next to the house logo).
Click on the "import" button at the top right and select the workflow ending with .ga
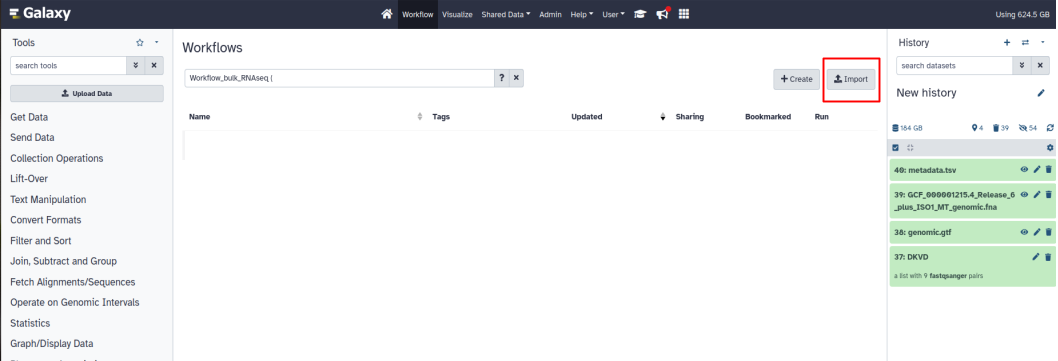
The workflow is now stored on Galaxy.
If the tools needed for the workflow are not already installed, install them in Galaxy.
To install new tools in Galaxy, place the folder containing the tool's .R and .xml files in the Galaxy/tools/newTools folder where Galaxy is installed.
Add these lines to the Galaxy/config/tool_conf.xml file (example for the cpm tool):
< section name="cpm" id="cpm">
< tool file="newTools/Cpm/cpm.xml" />
< /section>
Restart Galaxy to add the new tools.
These new tools are now available in the tools list on the left side of the Galaxy page and are automatically updated in the previously imported workflow.
¶ Step 6: Select workflow
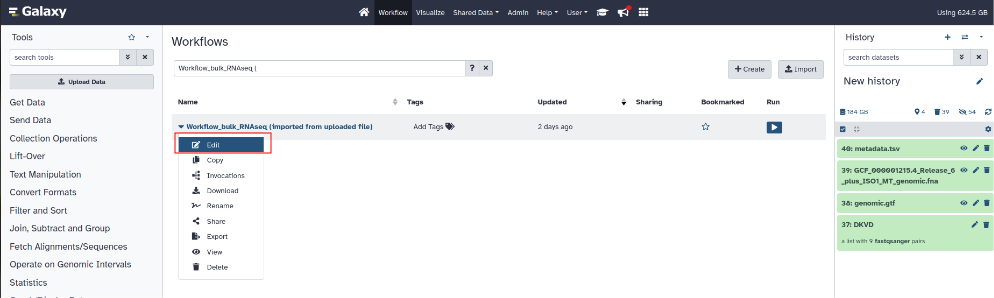
To select a workflow and launch it, click on the “Workflow” tab at the top in the middle of the page (next to the house logo).
Left click on the workflow then click on “Edit”.
¶ Step 7: Adjust workflow parameters
-
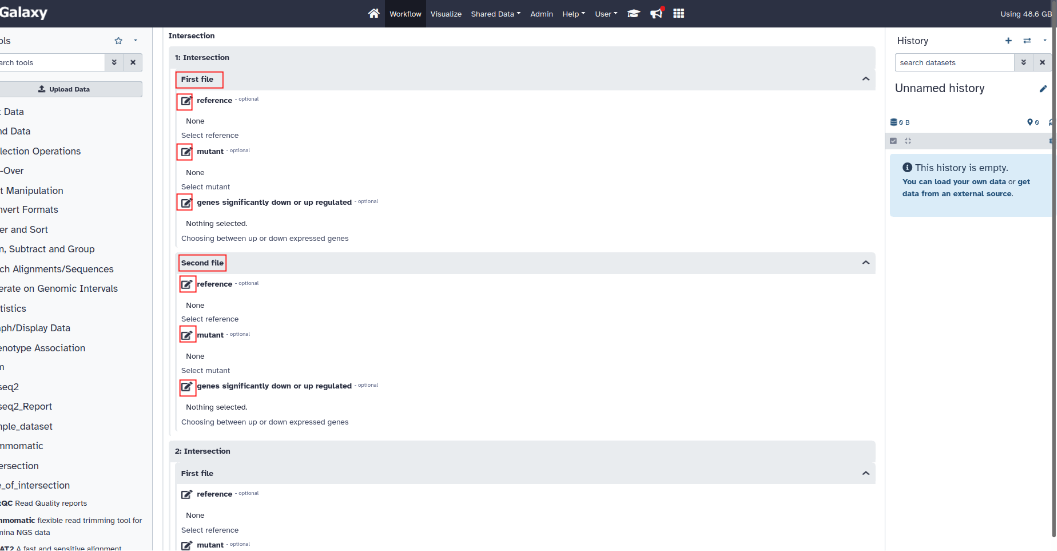
Intersection setting :
With the Intersection tool, you can compare 2 output files and see the common genes in the 2 files.
To choose the number of comparison to make :
On the workflow diagram go to the last box by clicking and moving forward at the same time with the mouse.
Click on the last box named “Intersection”. On the right side of the web page appear the parameters of this box.
In the settings of this box go to the "Insert Intersection" button to add the number of desired comparisons. You can delete some by clicking on the small trash logo.
Then click on the arrow at the top right of the web page to access the other settings. -
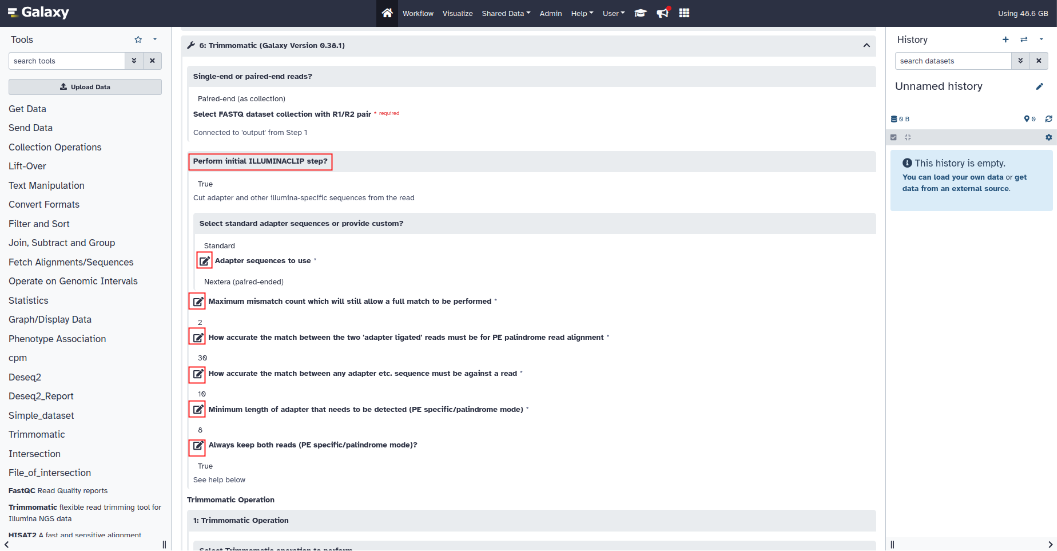
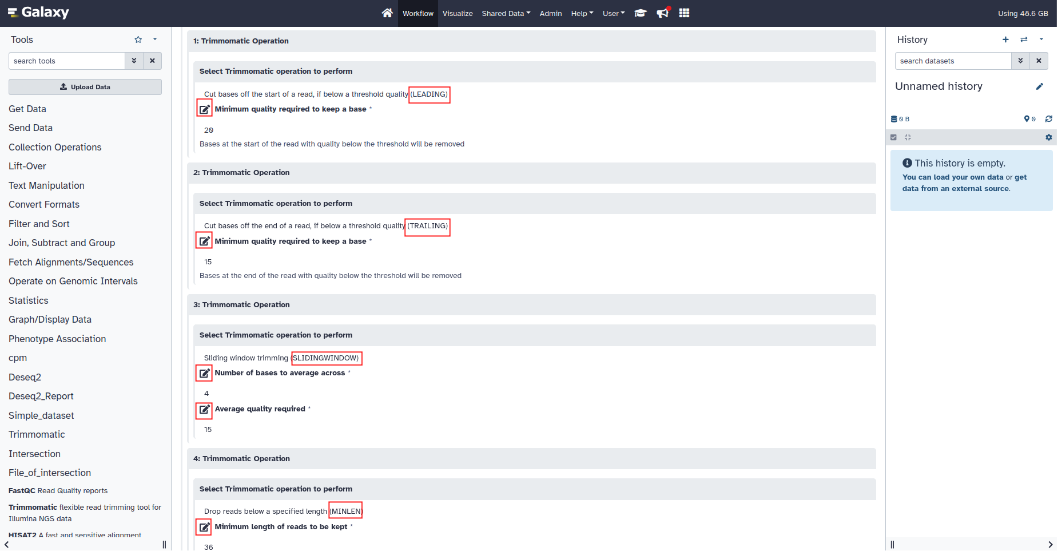
Trimmomatic setting :
To modify the parameters of the Trimmomatic tool, click on the Trimmomatic section to expand the parameters.
(Illuminaclip, Leading, Trailing, Slidingwindow, Minlen)
-
Cpm and filter setting :
To modify the parameters of the cpm (Counts Per Million) tool, click on the cpm section to expand the parameters.
“thread-sample” parameter: MANDATORY : Please enter the number of samples per condition in the “thread-sample” parameter.
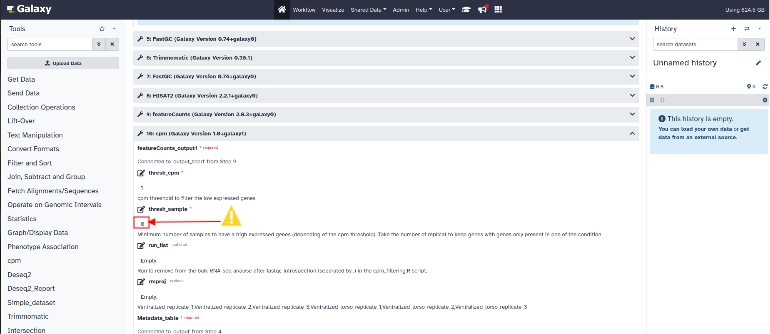
"thresh_cpm" parameter: cpm threshold to filter the low expressed genes
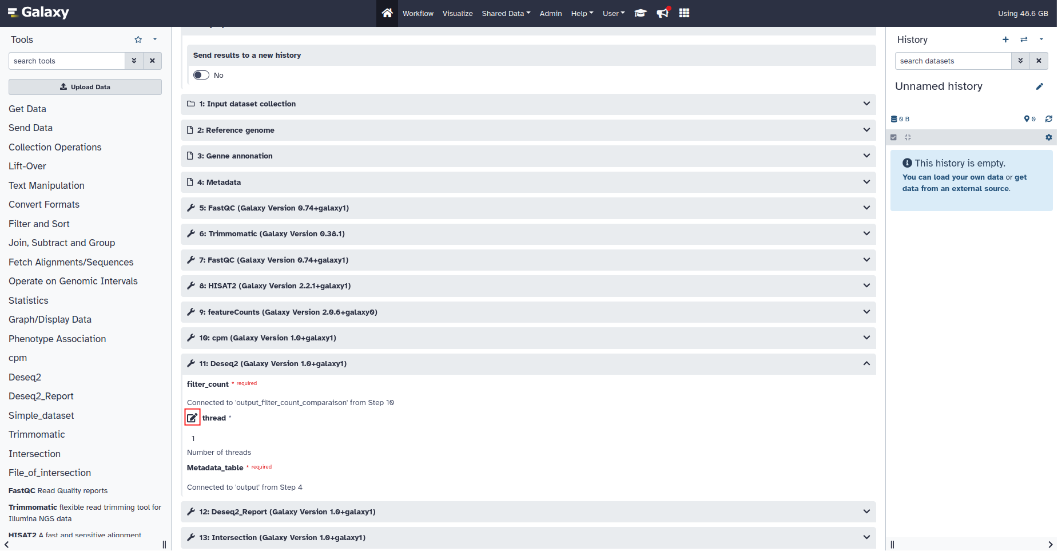
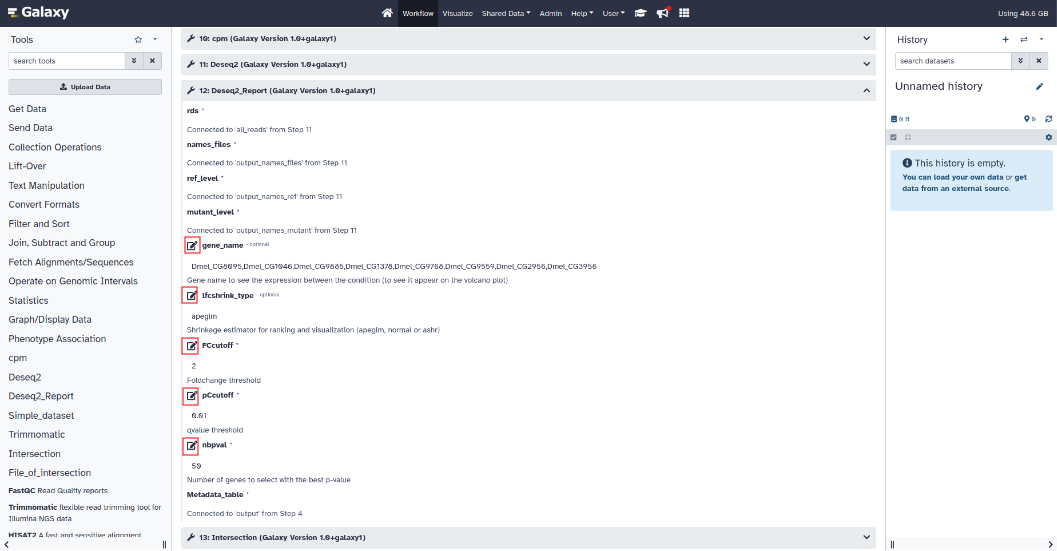
- Differential expression setting :
To modify the parameters of the Deseq2 tool, click on the Deseq2 section to expand the parameters.
"thread" parameter: number of threads
To modify the parameters of the Deseq2_Report tool, click on the Deseq2_Report section to expand the parameters.
"gene_name" parameter (optional): gene name to see the expression between the condition (to see it appear on the volcano plot)
"lfcshrink_type" parameter (optional): shrinkage estimator for ranking and visualization (apeglm, normal or ashr)
"FCcutoff" parameter: foldchange threshold
"pCcutoff" parameter: qvalue threshold
"nbpval" parameter: number of genes to select with the best p-value
- Intersection setting :
For each comparison, select the name of the condition which will be the reference and the name of the condition which will be considered as the mutant for the first file.
Also select whether these are up or down regulated genes.
Do the same for the second file.
¶ Step 8: Execute workflow
To run the workflow, return to the top of the web page then click on “Run workflow” (Dark blue button at the top right)
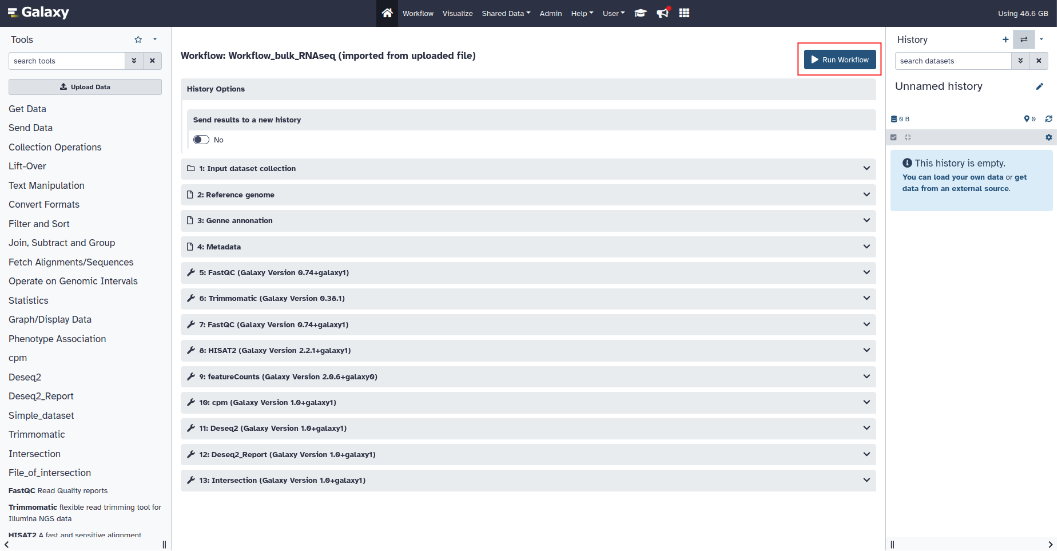
The output files will be displayed progressively in the history